What to know
With JMobile it is possible to run a VNC server on the panel by properly add the corresponding plug-in.
(check the FAQ How can I connect to the panel using a VNC client?)
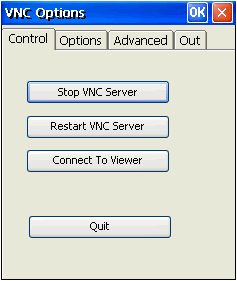
By default, the VNC Server needs to be executed (at least first time) from the LaunchVNC action configured into a button event.
Once the VNC application is started, it is needed to start the server and to set proper “Autostart” and “Silent” options in the Advanced tab, if required.

This FAQ explain how to avoid this first manual configuration of VNC Server by using, instead, a JavaScript code that allow to start and configure VNC Server at first project download and every next restart.
What to do
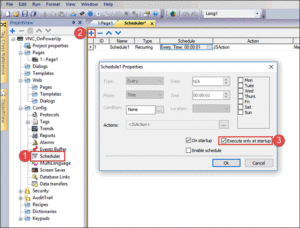
Create a new Scheduler enabling “On Startup” and “Execute only at startup” properties

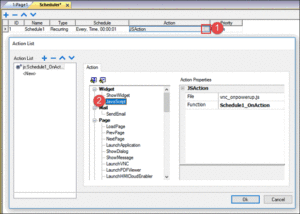
From Action windows, choose JavaScript action

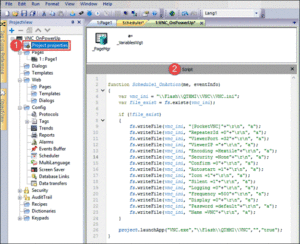
From Project properties expand the Script editor and insert the code below, between the function brackets created from the Scheduler.

This is the code for copy/paste purpose:
var vnc_ini = “\\Flash\\QTHMI\\VNC\\VNC.ini”;
var file_exist = fs.exists(vnc_ini);
if (!file_exist)
{
fs.writeFile(vnc_ini, “[PocketVNC]”+”\r\n”, “a”);
fs.writeFile(vnc_ini, “RepeaterId =0″+”\r\n”, “a”);
fs.writeFile(vnc_ini, “ViewerPort =32″+”\r\n”, “a”);
fs.writeFile(vnc_ini, “ViewerIP =”+”\r\n”, “a”);
fs.writeFile(vnc_ini, “Encoding =Hextile”+”\r\n”, “a”);
fs.writeFile(vnc_ini, “Security =None”+”\r\n”, “a”);
fs.writeFile(vnc_ini, “Confirm =0″+”\r\n”, “a”);
fs.writeFile(vnc_ini, “Autostart =1″+”\r\n”, “a”);
fs.writeFile(vnc_ini, “Icon =1″+”\r\n”, “a”);
fs.writeFile(vnc_ini, “Silent =1″+”\r\n”, “a”);
fs.writeFile(vnc_ini, “Logging =0″+”\r\n”, “a”);
fs.writeFile(vnc_ini, “Frequency =500″+”\r\n”, “a”);
fs.writeFile(vnc_ini, “Display =0″+”\r\n”, “a”);
fs.writeFile(vnc_ini, “Password =default”+”\r\n”, “a”);
fs.writeFile(vnc_ini, “Name =VNC”+”\r\n”, “a”);
}
project.launchApp(“VNC.exe”,”\\Flash\\QTHMI\\VNC”,””,”true”);
Download the project into the panel. As soon as the project starts, the VNC Server will be started and a VNC Client can connect.
In attachment there is a sample project that shows this functionality.
Applies to
eTOP500/600 series
JMobile Studio 2.0 or later
